- for Windows
- for Mac
Advanced Color Tuning
Color tuning, also known as color correction, is the process of changing or adjusting the colors in a video or photo.
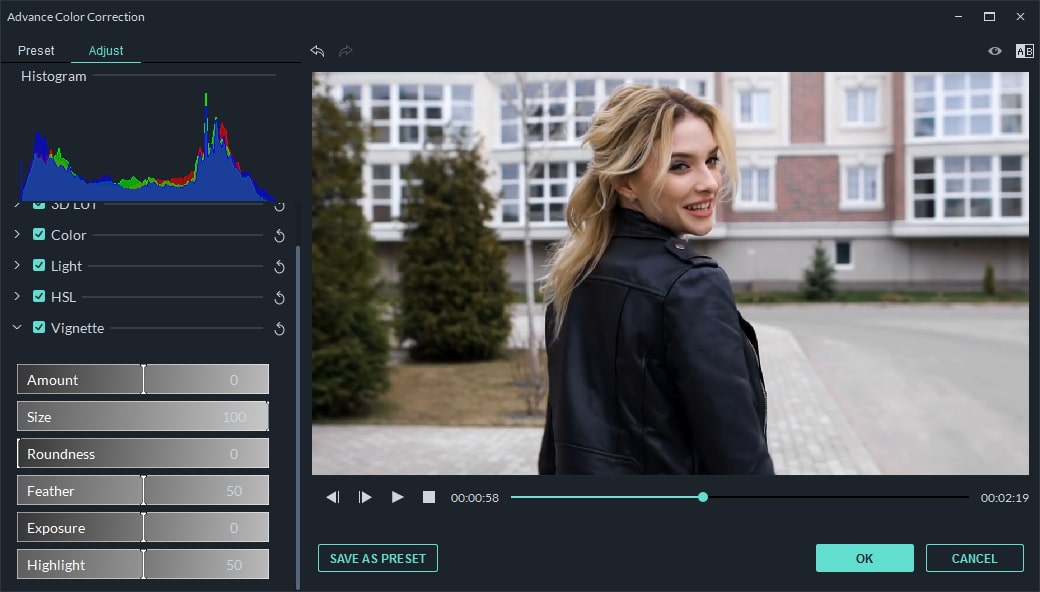
To enter the Advanced Color Correction window, double click the clip or image in the timeline. Then you will see a panel pop up, please click the Color tab and then click the Advanced button at the bottom.
There are two tabs in the Advanced Color Correction window: Preset and Adjust.
The color correction Presets in Filmora9 are the simplest way to achieve an enhanced cinematic look for your video.
If you want full control over fine-tuning your colors, you can make manual adjustments to things like color temperature, exposure, and more under Adjust.
To begin color tuning, drag and drop the video clip or image you want to adjust into the timeline. Make sure your clip or image is selected and click the color tuning icon to access the Advanced Color Correction window.
- Advanced Color Correction - Presets
- Advanced Color Correction - Adjust
- Preview your changes
- Save as preset
1. Advanced Color Correction - Presets
In the Preset tab you’ll see a wide selection of quality premade color settings including vignettes, cinematic 3D LUT effects, and film looks. If you save any custom color settings you’ll be able to find them easily by choosing Custom from the Preset dropdown menu.
To apply a preset from this menu to your video, double click on it and watch the Advanced Color Correction video preview to see what it looks like. If you’re happy with how your video looks, click OK.
2. Advanced Color Correction - Adjust
Here’s how you can fine tune your color settings in the Adjust tab.
Every menu in this section has a check box next to it and, by default, every box is checked. If you want to see a preview of your clip with only some of the changes you’re considering, uncheck the box next to the type of edits you want to turn off. You’ll be able to check the box again to turn them back on without have to redo all your work.
Clicking the refresh icon in any section will return the settings in that section to their defaults.
White Balance
You can create a specific atmosphere for your video by adjusting the color temperature and tint in this section. Here’s how:
- Click into the menu marked White Balance.
- Drag the Temperature slider forwards or backwards. Moving the slider backwards towards the blue end of the gradient ( negative values) will result in a colder looking image. Moving the slider forwards towards the yellow end of the gradient (positive values) will result in a warmer looking image.
- Drag the Tint slider to apply tints of different hues to your video.

3D LUT
A Look-Up Table (LUT) is a file containing instructions for replacing colors 3D LUTs are used extensively in the movie industry, and many of the 3D LUTs available in Filmora9 were inspired by Hollywood films and popular TV shows.. Here’s how to apply a 3D LUT:
- Click into the menu marked 3D LUT.
- Click the dropdown menu to see a list of available 3D LUTs.
- You can download and install additional 3D LUTs to your computer (from third party providers) and select Load New LUT to load them into Filmora9.

Color
In this section, you will be able to adjust Exposure, Brightness, Contrast, Saturation, and Vibrance easily by dragging the sliders associated with these qualities.
-Exposure: a negative value will darken all the colors in the video while a positive value will lighten them. Use this to fix images which are over or underexposed.
-Brightness: make the video brighter or darker.
-Exposure: lightens and darkens by affecting the highlights of an image. Brightness affects all tones equally.
-Contrast: adjust the contrast between lights and darks in your image. Dragging the slider forwards will make dark areas of your image darker and light areas lighter, while dragging the slider backwards will make darks lighter and lights darker.
-Saturation: dragging the slider forwards (positive values) increases the overall intensity of the color in your image while dragging the slider backwards (negative values) reduces color intensity and can cause your image to look grey.
-Vibrance: increases the intensity of the more muted colors and leaves the already saturated colors alone. This is useful for preventing skin tones from becoming overly saturated and unnatural.

Light
In this panel, you can optimize the light in your video by making adjustments to Highlights, Shadows, Whites, and Blacks. All of these qualities can be adjusted by dragging their associated sliders from left to right.

HSL
HSL is short for Hue, Saturation, and Luminance. This section is for adjusting individual color ranges in your video.
Select the color you want to adjust from the color panel and drag the sliders associated with Hue, Saturation, and Luminance to adjust only your selected color in the video.
Hue: fine tune the hue (i.e. lime green vs teal) of a specific color in the video. For example, you can change a blue sky (and all other blue objects) to colors between cyan and purple.
-Saturation: change the vividness of the color. For instance, you can change a faded blue sky to a highly saturated, vivid, blue sky.
-Luminance: change the brightness of the color range.

Vignette
You can apply a custom vignette effect to your video in this panel by dragging the sliders next to the following qualities.
-Amount: the corners of the video will become black when you drag the slider to the left, while dragging it right lightens them towards white.
-Size: dragging the slider to the left will increase area of your video affected by the vignette.
-Roundness: dragging the slider right will make the shape of your vignette closer to a circle.
-Feather: dragging this slider will adjust the sharpness of the vignette’s edges. The edge will be blurrier when you drag slider to the right, while dragging it to the left will result in a cleaner line.
-Exposure: dragging the slider will adjust the exposure of your video. This is the same setting you will find under color.
-Highlight: dragging the slider will adjust whether the blurry edges of your vignette are brighter or darker. If you pull the Feather setting all the way to the left and there is no blur, this setting will do nothing.

3. Preview your changes
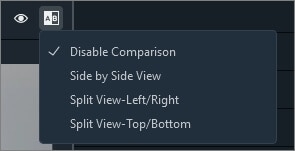
You can compare your color corrected video to your original video in the Advanced Color Correction window to decide if you’re happy with your changes.
Click the Before/After (A/B) icon in the top right corner of the window and choose whether you want to see the before and after video next to each other (Side by Side View), or if you want to see your changes applied to half of your screen (Split View - Left/Right, or Split View - Top/Bottom).
If you want to see your original video at any point during the color correction process, click the Show Original icon . You’ll be shown your original video for however long you click and hold. If you don’t like your recent changes, you can click the undo button in the top left corner of the preview.

4. Save as preset
If you want to use your customized color settings again, save the changes you’ve made in the Adjust tab as a new preset you can access from the Preset tab. Just click Save as Preset under the video preview.
